

Student Project Gallery for Learn Your CNC Academy

Barrie Knop
The Leaf Tray !!
Made in Western Australian Jarrah, measures 600mm long x 300mm wide and 50mm thick,
The Leaf Tray !!
Made in Western Australian Jarrah, measures 600mm long x 300mm wide and 50mm thick,
GS
Garry Strout
First go at using Vista Sculpt with Aspire. Hard maple and a mahogany frame. I wanted something other than the carve and frame all the same material. I used some of the tips from the recent Q & A's and that made it easier to get started. I found out that a 1/4 round nose down cut bit doesn't work very well for roughing in hard maple even with shallow cuts and a small step over. After starting over with an up cut with the same settings I had success.
First go at using Vista Sculpt with Aspire. Hard maple and a mahogany frame. I wanted something other than the carve and frame all the same material. I used some of the tips from the recent Q & A's and that made it easier to get started. I found out that a 1/4 round nose down cut bit doesn't work very well for roughing in hard maple even with shallow cuts and a small step over. After starting over with an up cut with the same settings I had success.
PV
Philip Virnoche
I carved this one this week. Both models were created using Vistasculpt. (that is my hand!)
It is going to be presented to the team on October 10th when they celebrate the 50th anniversary of their National Championship.
I carved this one this week. Both models were created using Vistasculpt. (that is my hand!)
It is going to be presented to the team on October 10th when they celebrate the 50th anniversary of their National Championship.

Dwight Ferguson
This is the finished carving with the treasure chest and fish. This is the first one that I've ever done that is painted this much.
Below is the unfinished version.
I used acrylic paint and had to order some very fine tipped brushesI I use the pictures of the fish that I used in Vista sculpt to make the models, and just painted it like the picture as best I could!
This is one of the fish I used.
This is the finished carving with the treasure chest and fish. This is the first one that I've ever done that is painted this much.
Below is the unfinished version.
I used acrylic paint and had to order some very fine tipped brushesI I use the pictures of the fish that I used in Vista sculpt to make the models, and just painted it like the picture as best I could!
This is one of the fish I used.

Wayne Burton
I've been working on this chest for a friend, it's got an epoxy inlay top with carvings on each end. It is Cherry with a Baltic birch tray.
I've been working on this chest for a friend, it's got an epoxy inlay top with carvings on each end. It is Cherry with a Baltic birch tray.

Dwight Ferguson
This is a 24" x 11" maple natural edge slab. I have made each of the items using Vista sculpt and generated them with their AI. All the fish, sharks, treasure, chest, and octopus and seaweed. The logs below the Treasure chest are designed and make and texture is also design and make for the sand bottom. I will be using Raymond Kinman's process for painting. I've already applied the base coat. I will post again when it is finished.
This is a 24" x 11" maple natural edge slab. I have made each of the items using Vista sculpt and generated them with their AI. All the fish, sharks, treasure, chest, and octopus and seaweed. The logs below the Treasure chest are designed and make and texture is also design and make for the sand bottom. I will be using Raymond Kinman's process for painting. I've already applied the base coat. I will post again when it is finished.

Dw
Here is another one from 2bumsandadog graphic and then turned into a model using VistaSculp. It is 13 1/2 inches tall by 18 1/2 inches wide by 1 1/4"on walnut.
For the last 20.years, I always use a natural clear oil from Bush Oil. Bush Oil is a high solids finish.
Here is another one from 2bumsandadog graphic and then turned into a model using VistaSculp. It is 13 1/2 inches tall by 18 1/2 inches wide by 1 1/4"on walnut.
For the last 20.years, I always use a natural clear oil from Bush Oil. Bush Oil is a high solids finish.

Dwight Ferguson
This is a sea turtle on black walnut 25 inches wide by 15 1/2 inches tall by 3 inches thick.

Dwight Ferguson
Here is another one from 2bumsandadog of an octopus that I modeled a pocket watch from in aspire and put the octopus in the center and turned it into a clock! It is 14 inches round 18 inches tall on black walnut.
Here is another one from 2bumsandadog of an octopus that I modeled a pocket watch from in aspire and put the octopus in the center and turned it into a clock! It is 14 inches round 18 inches tall on black walnut.

Dwight Ferguson
This was a drawing I got on Etsy from 2bumsandadog https://www.etsy.com/shop/2BumsandaDog?ref=shop-header-name&listing_id=1635707850&from_page=listing
They have phenomenal artwork that you can upload on VistaSculp and render into 3-D models very easily and excellently I should say! I carved this on ash, 11" x 16". I used Raymond Kinman's painting concept on it! I have done several using his technique and also 2bumsandadog artwork!
I'll upload more later!
This was a drawing I got on Etsy from 2bumsandadog https://www.etsy.com/shop/2BumsandaDog?ref=shop-header-name&listing_id=1635707850&from_page=listing
They have phenomenal artwork that you can upload on VistaSculp and render into 3-D models very easily and excellently I should say! I carved this on ash, 11" x 16". I used Raymond Kinman's painting concept on it! I have done several using his technique and also 2bumsandadog artwork!
I'll upload more later!

Tom Imel
Wifes friend had a baby so tried making a sign combining a frame with a sign.

Tom Imel
Created the Christmas ornament. Have 2 friends retiring this year so I made one for me for next year!

Dave Miragliotta
Thanks for all the help everybody and with the help from my wife Bonny
finally made it.
Thanks for all the help everybody and with the help from my wife Bonny
finally made it.

Dwight Ferguson
This is a Largemouth Bass laser graphic imported into Vista Sculpt. I used aspire to adjust a little and used texture on the border. It is a 3 x 20 x 27 inch walnut live edge slab.
This is a Largemouth Bass laser graphic imported into Vista Sculpt. I used aspire to adjust a little and used texture on the border. It is a 3 x 20 x 27 inch walnut live edge slab.
DS
Don Scott
A selection of gears, painted or gilded with brass, bronze, copper, iron, gold, and aluminum finished and then aged ( aggressive patina). Some of these gears look like they have been around since the 50's.
Four hours for the roughing toolpath, and 24 hours for the finish toolpath. Since it was cedar, there was quite a bit of cleaned up before I could start painting.
I discovered that you can assign a base height for an entire level. I made 47 different gears and made them with the same shape height and base height. Then I assigned each of five levels a different height., and the level added it's own base height to each item in the level. Each level had a different pitch diameter and pressure angle (based on the level I want ti to put it on.
A selection of gears, painted or gilded with brass, bronze, copper, iron, gold, and aluminum finished and then aged ( aggressive patina). Some of these gears look like they have been around since the 50's.
Four hours for the roughing toolpath, and 24 hours for the finish toolpath. Since it was cedar, there was quite a bit of cleaned up before I could start painting.
I discovered that you can assign a base height for an entire level. I made 47 different gears and made them with the same shape height and base height. Then I assigned each of five levels a different height., and the level added it's own base height to each item in the level. Each level had a different pitch diameter and pressure angle (based on the level I want ti to put it on.
MP
Matt Poore
Sign I made for local Dance Studio. Wanted to say thank you to Michael for helping me with flat depth problem I was having on V-carve lettering. In the Q&A on 7/29 he showed how flat depth can affect a V-bit when V-carving letters. Also thanks to the community members who gave me tips and tricks for cleaning up the wood fuzzies.
Sign I made for local Dance Studio. Wanted to say thank you to Michael for helping me with flat depth problem I was having on V-carve lettering. In the Q&A on 7/29 he showed how flat depth can affect a V-bit when V-carving letters. Also thanks to the community members who gave me tips and tricks for cleaning up the wood fuzzies.
SS
Scott Silvia
Made this as a donation for the Curly Coated Retrievers Association.
I was trying to make a two color 3d carve but I couldn’t get it right so I ended up gluing the 3d parts into the pocket. I still don’t have enough experience setting up a multi layered project. But I’m learning and will definitely try this again.
Made this as a donation for the Curly Coated Retrievers Association.
I was trying to make a two color 3d carve but I couldn’t get it right so I ended up gluing the 3d parts into the pocket. I still don’t have enough experience setting up a multi layered project. But I’m learning and will definitely try this again.

Dick Baynes
Hopefully all will be able to see this post…this is a write up about the 2-sided sign I did with pictures that appeared recently in the NH Sons of the American Revolution blog: https://nhsar.org/2025/07/28/honoring-general-henry-knox-a-new-sign-for-a-historic-site/ click on the link to see the post and all the pictures.
Hopefully all will be able to see this post…this is a write up about the 2-sided sign I did with pictures that appeared recently in the NH Sons of the American Revolution blog: https://nhsar.org/2025/07/28/honoring-general-henry-knox-a-new-sign-for-a-historic-site/ click on the link to see the post and all the pictures.

Jon Canfield
I did this one on maple, I'm very happy with the results. But a question for more experienced cnc'ers. What do you recommend for profiling thicker material?
This is 1.5" thick. I had to finish the cut out on a bandsaw and do quite a bit of sanding on the edges.
I did this one on maple, I'm very happy with the results. But a question for more experienced cnc'ers. What do you recommend for profiling thicker material?
This is 1.5" thick. I had to finish the cut out on a bandsaw and do quite a bit of sanding on the edges.

Wayne Burton
Some of the projects I’ve been having fun with lately, I need to put finishes on them and I might add some text to the H-D plaque before sizing it.
Some of the projects I’ve been having fun with lately, I need to put finishes on them and I might add some text to the H-D plaque before sizing it.

Jamal Alabbood
Just organized my bits making holder with my bambu lab A1 3d printer, thank for stockeman studios

Pete Buehn
Bartop I did using the molding toolpath. Milled into a walnut slab.
Ruth Woods
This is my very first project, albeit simple. This is our family's version of a marble game. I created the file from scratch using Vectric V-Carve (thanks to Kyle's LYCNC classes) and my machine is an Axiom Pro AR-8. The word "marbles" is an epoxy fill and the marble holes are hand painted.
This is my very first project, albeit simple. This is our family's version of a marble game. I created the file from scratch using Vectric V-Carve (thanks to Kyle's LYCNC classes) and my machine is an Axiom Pro AR-8. The word "marbles" is an epoxy fill and the marble holes are hand painted.

Tom Imel
Cedar box made for my son.

Tom Imel
St Patricks Day sign made for a friend.

Tony Duderewicz
Another VistaSculpt model I did using a 1/16 tapered ball nose bit @200ipm on pine

Dwight Ferguson
This is a 11" X 15"walnut carving from a picture for a friend's daughter's wedding. It's from the engagement photo. The dog is changed to put their new dog in. Used VistaSculpt for STL from Picture. Used Aspire and bits from 1/4" down to 1/64"
This is a 11" X 15"walnut carving from a picture for a friend's daughter's wedding. It's from the engagement photo. The dog is changed to put their new dog in. Used VistaSculpt for STL from Picture. Used Aspire and bits from 1/4" down to 1/64"
RS
Ron Stuart
A friend entered an Adult Assisted Living facility and when I visited I noticed many of the residents had name plaques/signs on their doors and Dale didn't have one so I made him one.
The old man & books was a STL file, I added thhe Vectric banner and Dale's name. Overall 13" w & 15"h
A friend entered an Adult Assisted Living facility and when I visited I noticed many of the residents had name plaques/signs on their doors and Dale didn't have one so I made him one.
The old man & books was a STL file, I added thhe Vectric banner and Dale's name. Overall 13" w & 15"h

Tony Duderewicz
I used VistaSculpt for this photo and it came out great, no tweaking of the file. I downloaded the stl and I used a 1/16" tapered ball nose bit only on this. It' an old piece of pine wood.
I used VistaSculpt for this photo and it came out great, no tweaking of the file. I downloaded the stl and I used a 1/16" tapered ball nose bit only on this. It' an old piece of pine wood.

Len Greiner
Finally made an edge lit base for the acrylic plant stand that I entered in last month's challenge. Works with a Habor Freight cell phone power pack. Top half of the base lifts off to change/charge the power pack.
Finally made an edge lit base for the acrylic plant stand that I entered in last month's challenge. Works with a Habor Freight cell phone power pack. Top half of the base lifts off to change/charge the power pack.

Dave Engelhardt
Hi Everyone.
This post is not necessarily on a project of wood but on Dust Collection. I originally started in a basement, and I had dust gates everywhere and really got tired of crawling over anything to open/close a gate. I have a 3HP Oneida Cyclone system so everything connects to it. That's when I started thinking about how nice it would be to automate the system.
When I moved to Texas, I ended up with putting in a system against the wall using 6" pipes and 6" dust gates. Then flex hose would connect to the different machines. I controlled the system manually for a while until I felt it was time to kick it up a notch.
My background is programming, and I love to create solutions that involve Hardware and Software. So, why not build a Dust Control System and have fun!
Below are some pics that show the current system. One of the pics shows a distant shot of the wall.
As you can see there are two panels being used and the Main Panel is a 7" touch (Master) while the one on the wall is a 4.3 touch panel (Slave Controller).
I programmed all the software and put the hardware together.
The two Touch control panels are WiFi connected and also to the Local Network. I can control gates from either panel and update the opposite one to keep current track and status of the gates. So, when I open "AL" the CNC Machine, for example on the Master, the Control Action is updated to reflect that operation and sent to the other panel. I can also use the Slider control and move the gate anywhere between open and close. Nice when I want to open an additional gate and do some sanding.
The Slave unit on the wall is used to actually control the Servos that are attached to each Dust Gate's Slider. The backet I use to attach the RC Servo to the gate was an idea I got from the web, so I thank whoever that was. I had to modify it to get it working for my system. You need to have Heavy Duty Servo's that can handle the open/close force for each gate.
Since the Dust System is Wi-Fi connected I can do remote updates/changes from the computer in my office.
I hope you find this interested and wanted to share it. Oh yeah, in case someone is thinking about hooking this into Alexa, I tried it. She can't hear thru all the noise, but it was fun.
Hi Everyone.
This post is not necessarily on a project of wood but on Dust Collection. I originally started in a basement, and I had dust gates everywhere and really got tired of crawling over anything to open/close a gate. I have a 3HP Oneida Cyclone system so everything connects to it. That's when I started thinking about how nice it would be to automate the system.
When I moved to Texas, I ended up with putting in a system against the wall using 6" pipes and 6" dust gates. Then flex hose would connect to the different machines. I controlled the system manually for a while until I felt it was time to kick it up a notch.
My background is programming, and I love to create solutions that involve Hardware and Software. So, why not build a Dust Control System and have fun!
Below are some pics that show the current system. One of the pics shows a distant shot of the wall.
As you can see there are two panels being used and the Main Panel is a 7" touch (Master) while the one on the wall is a 4.3 touch panel (Slave Controller).
I programmed all the software and put the hardware together.
The two Touch control panels are WiFi connected and also to the Local Network. I can control gates from either panel and update the opposite one to keep current track and status of the gates. So, when I open "AL" the CNC Machine, for example on the Master, the Control Action is updated to reflect that operation and sent to the other panel. I can also use the Slider control and move the gate anywhere between open and close. Nice when I want to open an additional gate and do some sanding.
The Slave unit on the wall is used to actually control the Servos that are attached to each Dust Gate's Slider. The backet I use to attach the RC Servo to the gate was an idea I got from the web, so I thank whoever that was. I had to modify it to get it working for my system. You need to have Heavy Duty Servo's that can handle the open/close force for each gate.
Since the Dust System is Wi-Fi connected I can do remote updates/changes from the computer in my office.
I hope you find this interested and wanted to share it. Oh yeah, in case someone is thinking about hooking this into Alexa, I tried it. She can't hear thru all the noise, but it was fun.

Robert Sandstrom
For the past 25 years I have been making period-accurate, fully functioning, medieval crossbows for reenactors. All the inletting and carving was done by hand. Enter the CNC. It has taken me about 8 years and many challenges to create a repeatable file to run on my CNC. The biggest challenge was holding my piece. The first step is to flatten my billet parallel to the bed and carve the internal mortises. Then flip and carve the external. The alignment must be precise otherwise the mortises and holes won't line up. Since the entire 10X30 blank must be flattened, I had to move clamps as the carving progressed. This caused some slight movement which threw the alignment off. I next tried glue/accelerator and blue tape. Again, not secure enough. Next up was using composite nails. It held secure but caused issues when the piece was flipped. Finally, I took the plunge and got an Air Weights vacuum table. I designed and carved a 3/4" fixture plate. This works like a charm.
For the past 25 years I have been making period-accurate, fully functioning, medieval crossbows for reenactors. All the inletting and carving was done by hand. Enter the CNC. It has taken me about 8 years and many challenges to create a repeatable file to run on my CNC. The biggest challenge was holding my piece. The first step is to flatten my billet parallel to the bed and carve the internal mortises. Then flip and carve the external. The alignment must be precise otherwise the mortises and holes won't line up. Since the entire 10X30 blank must be flattened, I had to move clamps as the carving progressed. This caused some slight movement which threw the alignment off. I next tried glue/accelerator and blue tape. Again, not secure enough. Next up was using composite nails. It held secure but caused issues when the piece was flipped. Finally, I took the plunge and got an Air Weights vacuum table. I designed and carved a 3/4" fixture plate. This works like a charm.

Tom Imel
New Camping sign for a friend.

Jeremy Odell
Seeking advice on this medal holder for my daughter. After many iterations, I have created this honeycomb design with an inlay. I added some pop to it with the inlay, I liked the multi-color.
I did the step inlay for the male part. So the outside hex has a small lip to hold the male part in place. I like this but now the center piece is stuck and not removable. Furthermore I am using 3M tape, applied to the outer edge and stuck on the wall. The issue with this is I cant move them after putting on the wall without peeling off the paint!
Looking for feedback for any improvement ideas. I have to make a lot of these!
Seeking advice on this medal holder for my daughter. After many iterations, I have created this honeycomb design with an inlay. I added some pop to it with the inlay, I liked the multi-color.
I did the step inlay for the male part. So the outside hex has a small lip to hold the male part in place. I like this but now the center piece is stuck and not removable. Furthermore I am using 3M tape, applied to the outer edge and stuck on the wall. The issue with this is I cant move them after putting on the wall without peeling off the paint!
Looking for feedback for any improvement ideas. I have to make a lot of these!
PV
Philip Virnoche
Here are a couple I designed and cut for a friends sons's wedding. Kyles class is really sinking in with me now as well as all the guidance in his and Michaels weekly Q and A's.
Here are a couple I designed and cut for a friends sons's wedding. Kyles class is really sinking in with me now as well as all the guidance in his and Michaels weekly Q and A's.
Lester Sak
My daughter is getting married in November and had asked if I could make some things for the wedding.
I just finished the first one, a gift card box made from cherry with a lock and a slot on top to drop the card through. I've made many boxes, but never did a curved top before. I should have had straight sides on the lid where it meets the box which would have given me better options for hinges, but it worked out.
Still to do: a guest sign-in board, a welcome sign for the guests, signs for each of the bars listing the bride & grooms signature drinks as well as the available beer, wine & liquor, and a sign for the sweetheart table. Things are a lot different since my wife and I married, lol.
My daughter is getting married in November and had asked if I could make some things for the wedding.
I just finished the first one, a gift card box made from cherry with a lock and a slot on top to drop the card through. I've made many boxes, but never did a curved top before. I should have had straight sides on the lid where it meets the box which would have given me better options for hinges, but it worked out.
Still to do: a guest sign-in board, a welcome sign for the guests, signs for each of the bars listing the bride & grooms signature drinks as well as the available beer, wine & liquor, and a sign for the sweetheart table. Things are a lot different since my wife and I married, lol.
DS
Don Scott
Here is a panel that I made, 21 hour carve. 24 " wide.

Tony Duderewicz
Carved this out of Baltic birch ply for my new workshop. 15" wide
DS
Don Scott
The Necklace Holder from Lesson 241

Wayne Burton
These are a couple things I've been working on this last week. I designed the steps for our pet in Sketchup and used a table top that was made a while back for the frame.
These are a couple things I've been working on this last week. I designed the steps for our pet in Sketchup and used a table top that was made a while back for the frame.
MN
Michael Norton
With summer finally hitting here in north eastern PA, I felt necessary to make a toy for my grandson when he has his pool time.
I made this tug boat based on a project I seen on Rockler online project page (https://www.rockler.com/learn/project-build-wooden-toy-tugboat?linkID=&mcID=922%3A684b3a7faf433b25c1006dec%3Aot%3A62fc1ee852663a710c3fa45f%3A1). Thanks hope it gives some inspiration.
With summer finally hitting here in north eastern PA, I felt necessary to make a toy for my grandson when he has his pool time.
I made this tug boat based on a project I seen on Rockler online project page (https://www.rockler.com/learn/project-build-wooden-toy-tugboat?linkID=&mcID=922%3A684b3a7faf433b25c1006dec%3Aot%3A62fc1ee852663a710c3fa45f%3A1). Thanks hope it gives some inspiration.

Tom Imel
Made this camping sign at a request from friend. New to Aspire but wanted to see if I could do it. Creating the Clementine from a pic was the hardest part. Made from Oak pieces that have been laying around for a long time.
Made this camping sign at a request from friend. New to Aspire but wanted to see if I could do it. Creating the Clementine from a pic was the hardest part. Made from Oak pieces that have been laying around for a long time.

Mark Haskins
This was a sign I made for one of our neighbor hood Fire dept. we are lucky to have one just down the street!
MS
Matt Stouffer
Brand newbie here. About 35% done with Kyle's master aspire coarse but like always.....I cant wait,soooo,,, I carved some stuff before even knowing what im doing....ha.
Tribute to my Dad.WWII vet.P51 mechanic. Looking forward to more knowledge. Thanks Kyle!
Brand newbie here. About 35% done with Kyle's master aspire coarse but like always.....I cant wait,soooo,,, I carved some stuff before even knowing what im doing....ha.
Tribute to my Dad.WWII vet.P51 mechanic. Looking forward to more knowledge. Thanks Kyle!

Tom Imel
Clock created to celebrate my son graduating from Purdue University with a BSEE.

Simon Chambers
Owner, english woodman
Have tried several time but testimonial won't send.
Allan Cabalar
I made this Perpetual Calendar Clock after enrolling to Learn Your CNC Academy. I learned how to design projects using Vcarve Pro. I know this is far from perfect but seeing the results of my work is one of my biggest motivations. As a beginner, I faced some challenges in making this kind of project but with patience and passion for learning new things, I was able to finish it.
I made this Perpetual Calendar Clock after enrolling to Learn Your CNC Academy. I learned how to design projects using Vcarve Pro. I know this is far from perfect but seeing the results of my work is one of my biggest motivations. As a beginner, I faced some challenges in making this kind of project but with patience and passion for learning new things, I was able to finish it.
MN
Michael Norton
Recent projects. Cherry was used for both. Enjoying my cnc.

Rock Toone
I am now a retired Fireman and we installed a fireplace in my last station and just had to create the mantle piece!

John Scarlett
These are a couple of letter openers I made recently. The one on the right is from a 3 video series Vetric has on their website in the Tips and Tricks section of their Inspiration tab. It was great practice, mainly using the 2 rail sweep tool in Aspire. Then for more practice, I modeled the one on the left from a picture I found on the internet and added some 3D clipart to spice it up a bit. Fun Project!
These are a couple of letter openers I made recently. The one on the right is from a 3 video series Vetric has on their website in the Tips and Tricks section of their Inspiration tab. It was great practice, mainly using the 2 rail sweep tool in Aspire. Then for more practice, I modeled the one on the left from a picture I found on the internet and added some 3D clipart to spice it up a bit. Fun Project!

Clinton Callaway
A neighbor asked me to make this sign for them.
Kyle showed me how to make 3d letters in Vcarve pro
Making the letters and numbers into 3d files and bringing all the components together
It looks beautiful don't you agree?
A neighbor asked me to make this sign for them.
Kyle showed me how to make 3d letters in Vcarve pro
Making the letters and numbers into 3d files and bringing all the components together
It looks beautiful don't you agree?
RS
Robert Sandstrom
I am attaching a picture of my most recent cribbage board design. Following @Lucky Warwick on his design for a Oregon State shaped cribbage board. This one is a cribbage board in the California State design and initially made as a donation to the SDFWA for their holiday gift sale the week before Thanksgiving.
I have posted a question in the QA section to see if there is an easier method for making the cribbage board design holes line up when designing odd shapes. I have made many standard cribbage boards, rectangle boards, circle and oval boards where I am using the circular or rectangle pattern tools. But placing the holes along the path with proper spacing and minimal manual labor by rearranging many of the holes in manual mode along the curves, etc. seemed harder than I would've expected.
I have had people reach out to try and help me but I was not able to successfully implement their recommendations. That is what I enjoy about being part of this group, people willing to help.
I figured that this is something where if I can get a knowledge gap filled for myself and help others it was worth asking the question in one of our QA sessions. We will soon see during the next QA if there is something I am missing in my knowledge. It wouldn't be the first time.
I am attaching a picture of my most recent cribbage board design. Following @Lucky Warwick on his design for a Oregon State shaped cribbage board. This one is a cribbage board in the California State design and initially made as a donation to the SDFWA for their holiday gift sale the week before Thanksgiving.
I have posted a question in the QA section to see if there is an easier method for making the cribbage board design holes line up when designing odd shapes. I have made many standard cribbage boards, rectangle boards, circle and oval boards where I am using the circular or rectangle pattern tools. But placing the holes along the path with proper spacing and minimal manual labor by rearranging many of the holes in manual mode along the curves, etc. seemed harder than I would've expected.
I have had people reach out to try and help me but I was not able to successfully implement their recommendations. That is what I enjoy about being part of this group, people willing to help.
I figured that this is something where if I can get a knowledge gap filled for myself and help others it was worth asking the question in one of our QA sessions. We will soon see during the next QA if there is something I am missing in my knowledge. It wouldn't be the first time.

Len Greiner
I took an idea from an Etsy post and changed it up a bit to make a unique stand for the wedding gift. It has the same profile as the plaque does. I flamed it after to make it clear again.
Each project has at least one learning lesson in it. I thought I would save some time on the profile pass and set my start depth at .25 since most of the material had already been cleared away with the moulding toolpath. I hate to cut air.
The lesson came when I didn't think about the material on the side and put a lead in and out on the profile toolpath. With the .25 start depth the 1/8" o-flute went out past the acrylic, dropped .25, made a left and snapped right off. It took longer to change the broken bit than I saved by starting at .25. It was a cheap SpeTool bit, but it still pisses me off when I don't think things through.
It has a few minor imperfections, and I'll probably make another one for them and keep this one for myself. It took a long minute to get the right combination of brass rod lengths to get it to set just right. I made three different sets and used the center rod from one and the arms from another.
I took an idea from an Etsy post and changed it up a bit to make a unique stand for the wedding gift. It has the same profile as the plaque does. I flamed it after to make it clear again.
Each project has at least one learning lesson in it. I thought I would save some time on the profile pass and set my start depth at .25 since most of the material had already been cleared away with the moulding toolpath. I hate to cut air.
The lesson came when I didn't think about the material on the side and put a lead in and out on the profile toolpath. With the .25 start depth the 1/8" o-flute went out past the acrylic, dropped .25, made a left and snapped right off. It took longer to change the broken bit than I saved by starting at .25. It was a cheap SpeTool bit, but it still pisses me off when I don't think things through.
It has a few minor imperfections, and I'll probably make another one for them and keep this one for myself. It took a long minute to get the right combination of brass rod lengths to get it to set just right. I made three different sets and used the center rod from one and the arms from another.
GW
Grant Wilkinson
I was looking for something special to give my wife for Valentine's Day and came across this on the Vectric site. I lasered a private message to my wife on the back panel.
I was looking for something special to give my wife for Valentine's Day and came across this on the Vectric site. I lasered a private message to my wife on the back panel.

Len Greiner
My son's best friend growing up is getting married and I made them this as a wedding gift. This kid grew up in my home or I wouldn't spend this much time and energy on a carve if he was just someone I know. This took 14 hours to carve and a few hours to finish and I don't like most people enough to give them that much of my life.
The file was purchased on 3dWave and I added the wedding rings from the clipart library. Their files have been top notch. I used the Moulding Toolpath to create the frame, and finish carved it with a 1/64r TBN.
This was the first thing that I cut since learning about re-starting a carve from a line of code. You can see slight lines where a re-start was performed, and I should have spent more time to sand them out. They didn't seem as bad until I clear coated it and then they seemed to pop out. The detail of this carve is simply amazing to me.
My son's best friend growing up is getting married and I made them this as a wedding gift. This kid grew up in my home or I wouldn't spend this much time and energy on a carve if he was just someone I know. This took 14 hours to carve and a few hours to finish and I don't like most people enough to give them that much of my life.
The file was purchased on 3dWave and I added the wedding rings from the clipart library. Their files have been top notch. I used the Moulding Toolpath to create the frame, and finish carved it with a 1/64r TBN.
This was the first thing that I cut since learning about re-starting a carve from a line of code. You can see slight lines where a re-start was performed, and I should have spent more time to sand them out. They didn't seem as bad until I clear coated it and then they seemed to pop out. The detail of this carve is simply amazing to me.

Dwight Ferguson
I did a heart for my wife from our pets with a base stand.
JB
John Barker
Cypress wood with Vcarve walnut inlays for the numbers using 60 deg V bit. Has a keyhole slot on back to hang.
CF
Chuck Freed
My Mother's Day Heart. Dark walnut so its hard to see in the pic.

Tom Imel
Volunteer work to raise money for a free Hospice Center in my area.

Tom Imel
Mothers Day Sign from Kyle's Class
MN
Michael Norton
I finally felt capable of designing and cutting out new aluminum mounting plates to upgrade my two year old Openbuilds Lead 1010 from V-wheels on X and Z axis to HGR15 linear rails. Replacing the wheels as they wore or cracked was tedious. To some this may seem trivial but to me it was proving my progress of learning the software and hardware. The tolerances have been greatly increased after adding the linear rails. The Y axis will get upgraded when I am able to obtain more linear rails. Thanks for looking.
I finally felt capable of designing and cutting out new aluminum mounting plates to upgrade my two year old Openbuilds Lead 1010 from V-wheels on X and Z axis to HGR15 linear rails. Replacing the wheels as they wore or cracked was tedious. To some this may seem trivial but to me it was proving my progress of learning the software and hardware. The tolerances have been greatly increased after adding the linear rails. The Y axis will get upgraded when I am able to obtain more linear rails. Thanks for looking.
CF
Caleb Foulks
One of my first projects.
RS
Robert Sandstrom
Built this game for the family, not sure I want to go through the effort of marketing and selling because it required me to manually paint and I don’t enjoy the painting part. I can make for others if they really want but it isn’t a cheap one if I will make money for my material and time. I really like the look of this BAMX Material from Cutting It Close.
The material can be purchased at this link: https://cicworkshop.com/products/bamx...
Full disclosure: It is an affiliate link so I get a small commission if you purchase.
My family has 7 people living in the house so the previous 4 person aggravation style games didn’t allow us all to play at the same time and didn’t want to leave a family member out. I developed this 8 person version to resolve the issue. And liked the BAMX material look.
I wanted to be able to build marble storage into the board but the approximately 0.745” didn’t provide adequate pocket room with material above and below the pocket for the 14mm marbles and dice. Material above, so the marble holes don’t go through . Material below so a sturdy lid could be mounted with magnets or some other method. Because of this I opted to 3D print a separate marble holder. Lid not shown.
I designed in Fusion so that all I do is put in the number of players, and sizze of the marble and Fusion will make the case the correct size for the storage. That was fun figuring out the parametric dessign for that.
#bamx #aggravation #gameboard #familytime #games
Built this game for the family, not sure I want to go through the effort of marketing and selling because it required me to manually paint and I don’t enjoy the painting part. I can make for others if they really want but it isn’t a cheap one if I will make money for my material and time. I really like the look of this BAMX Material from Cutting It Close.
The material can be purchased at this link: https://cicworkshop.com/products/bamx...
Full disclosure: It is an affiliate link so I get a small commission if you purchase.
My family has 7 people living in the house so the previous 4 person aggravation style games didn’t allow us all to play at the same time and didn’t want to leave a family member out. I developed this 8 person version to resolve the issue. And liked the BAMX material look.
I wanted to be able to build marble storage into the board but the approximately 0.745” didn’t provide adequate pocket room with material above and below the pocket for the 14mm marbles and dice. Material above, so the marble holes don’t go through . Material below so a sturdy lid could be mounted with magnets or some other method. Because of this I opted to 3D print a separate marble holder. Lid not shown.
I designed in Fusion so that all I do is put in the number of players, and sizze of the marble and Fusion will make the case the correct size for the storage. That was fun figuring out the parametric dessign for that.
#bamx #aggravation #gameboard #familytime #games

Wayne Burton
A couple projects I’ve done in the last several days. Both are made of cherry and finished with tung oil. The tray is 14 5/8 x 11 3/4 x 1 3/4.
A couple projects I’ve done in the last several days. Both are made of cherry and finished with tung oil. The tray is 14 5/8 x 11 3/4 x 1 3/4.

Wayne Precht
Thanks to the advice I received here and on the Q&A show, about creating gothic tracery, I was able to decorate this copy of a 15th Century French bench on my Genmitsu PROVerXL 6050 Plus. Already I can see the charm of a CNC with ATC. This design uses 4 bits for the legs.
Dimensions are 20" tall, 11.5" wide and 25" long. Red oak.
Thanks to the advice I received here and on the Q&A show, about creating gothic tracery, I was able to decorate this copy of a 15th Century French bench on my Genmitsu PROVerXL 6050 Plus. Already I can see the charm of a CNC with ATC. This design uses 4 bits for the legs.
Dimensions are 20" tall, 11.5" wide and 25" long. Red oak.

Len Greiner
My son got me a set of handmade knives for my birthday, so I made them a magnetic knife block. My plan is to add an edge lit acrylic panel in front, i.e. the slot in the base, later. Now if somebody breaks in the house, I can strip all the knives off of here and beat them to death with the block, 24 ceramic magnets adds up the old weight.
First time using laminated bamboo, it actually cut pretty nice.
My son got me a set of handmade knives for my birthday, so I made them a magnetic knife block. My plan is to add an edge lit acrylic panel in front, i.e. the slot in the base, later. Now if somebody breaks in the house, I can strip all the knives off of here and beat them to death with the block, 24 ceramic magnets adds up the old weight.
First time using laminated bamboo, it actually cut pretty nice.

Wayne Burton
I carved this a while back and have been playing with the finish on it, my wife and I did the epoxy ( only second time using epoxy, just experimenting) and she dry brushed the detail. I think I’m going to call it done.
I carved this a while back and have been playing with the finish on it, my wife and I did the epoxy ( only second time using epoxy, just experimenting) and she dry brushed the detail. I think I’m going to call it done.

Marcus Pedroza
Another successful project completed, many thanks to the lessons learned here with Tiling Toolpaths!

Jon Canfield
My first project with VCarve and my Shapeoko 5. Definitely a learning curve over Carbide Create. This is far from perfect, but my grandson will love it.
My first project with VCarve and my Shapeoko 5. Definitely a learning curve over Carbide Create. This is far from perfect, but my grandson will love it.

Jude Shellito
Hey group, made another snack tray ! V carve Pro and the live classes make this easy. The new bowl bit is the GOAT. Fast and very smooth on the bottom, toolstoday #45986.
Hey group, made another snack tray ! V carve Pro and the live classes make this easy. The new bowl bit is the GOAT. Fast and very smooth on the bottom, toolstoday #45986.

Jamal Alabbood
One side project carving soap holder designed and cut with cnc

Tom Imel
I created this French Cleat bracket for stacking Bar Clamps. You can adjust width of 2 parts to make it work for other clamps than what I have shown. VCarve file available upon request.
I created this French Cleat bracket for stacking Bar Clamps. You can adjust width of 2 parts to make it work for other clamps than what I have shown. VCarve file available upon request.

Tom Imel
French Cleat hammer holder. VCarve file available upon request.

Tom Imel
Finished this clock for my son. Tried adding led lights for first time.

Wayne Burton
Here are 2 of the projects I made in the last few days. The sign still has to be painted.
Ray Lewis
RTL Custom Woodworking
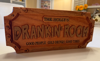
I made this bar sign for a coworker. They love bourbon and the bar in their home is called the “Drankin Room”. Was a quick little project on a Saturday.
I made this bar sign for a coworker. They love bourbon and the bar in their home is called the “Drankin Room”. Was a quick little project on a Saturday.
Lester Sak
I finished a model I made of my son & daughter, which I carved from Rosewood. The wood is beautiful, but the grain pattern was a little too distracting, so I decided to try and paint it. Not great but I'm happy with my first shot at this. The faces are the most difficult to paint, but I learned about layering paint, shading and dry brush techniques.
I finished a model I made of my son & daughter, which I carved from Rosewood. The wood is beautiful, but the grain pattern was a little too distracting, so I decided to try and paint it. Not great but I'm happy with my first shot at this. The faces are the most difficult to paint, but I learned about layering paint, shading and dry brush techniques.

Len Greiner
I finally had time and warm weather to finish the sign that I started during last month's challenge. Late for the challenge, but I think it turned out pretty well.
I finally had time and warm weather to finish the sign that I started during last month's challenge. Late for the challenge, but I think it turned out pretty well.

Pete Buehn
This is a retirement clock I did for a fellow instructor pilot in the C-17. It is patterned after elements in the pilots Heads Up Display. All the inlay work is using face grain and the hands were cut out using the OPT laser on my AVID CNC. I sloped the face to resemble the earth using the V Carve molding tool path.
This is a retirement clock I did for a fellow instructor pilot in the C-17. It is patterned after elements in the pilots Heads Up Display. All the inlay work is using face grain and the hands were cut out using the OPT laser on my AVID CNC. I sloped the face to resemble the earth using the V Carve molding tool path.

Allan Cabalar
Did some carvings during my visit to my country (Philippines)last month. My first try with my CNC machine.
RS
Robert Sandstrom
Created this two sided bowl (epoxy resin lip, white oak, and maple) using Aspire. This one could be done using vCarve pro if the "drip stock" model was imported from an STL file. This was done using a two sided project, profile, and pocket tool paths. I will create a video on how I did this soon. Already created a video on how I got this brilliant shine using my lathe - if interested go checkout my YouTube Channel Rob Sandstrom Designs
Created this two sided bowl (epoxy resin lip, white oak, and maple) using Aspire. This one could be done using vCarve pro if the "drip stock" model was imported from an STL file. This was done using a two sided project, profile, and pocket tool paths. I will create a video on how I did this soon. Already created a video on how I got this brilliant shine using my lathe - if interested go checkout my YouTube Channel Rob Sandstrom Designs

Marcus Pedroza
Another house warming gift for a coworker. Included is his wife's vision for what she wanted.

Tom Imel
New welcome sign for house.

Wayne Burton
I did the Haunted Mansion plague this weekend and the other two during the week. My wife painted the Welcome sign but I need to finish it and the others.
I did the Haunted Mansion plague this weekend and the other two during the week. My wife painted the Welcome sign but I need to finish it and the others.

Len Greiner
My wife makes pictures with small colored dots and always has many dots left over when she finishes.
I mixed them all together and pocket cut the letters in a decorative cutting board that she picked up at Walmart with her niece’s name.
I then poured it with epoxy for the final touches.
I think it turned out very unique.
My wife makes pictures with small colored dots and always has many dots left over when she finishes.
I mixed them all together and pocket cut the letters in a decorative cutting board that she picked up at Walmart with her niece’s name.
I then poured it with epoxy for the final touches.
I think it turned out very unique.

Wayne Burton
I carved this over the weekend out of cherry and haven’t decided on a finish.
RS
Robert Sandstrom
My most recent model that I used the learning from this training program and lives to be able to do. this model was designed completely from my imagination. I have been using some material from CIC workshop for trays and other projects and wondered how it would look glued up and put in a bowl. Making a video on the process for my YouTube Channel at this time. Should release within the next week to show the process. It wasn't as difficult as I had thought it would be, the more of these I make the easier they are to create. I used the create rounded shape component, limit (zero) plane, and 3D tabs features to create the bowl and setup the toolpaths. It was a combination of 3D model and pocket tooldpaths to get what was desired. Attaching pictures of the final bowl to show results of using the BAMX material.
My most recent model that I used the learning from this training program and lives to be able to do. this model was designed completely from my imagination. I have been using some material from CIC workshop for trays and other projects and wondered how it would look glued up and put in a bowl. Making a video on the process for my YouTube Channel at this time. Should release within the next week to show the process. It wasn't as difficult as I had thought it would be, the more of these I make the easier they are to create. I used the create rounded shape component, limit (zero) plane, and 3D tabs features to create the bowl and setup the toolpaths. It was a combination of 3D model and pocket tooldpaths to get what was desired. Attaching pictures of the final bowl to show results of using the BAMX material.

Marcus Pedroza
This was my second attempt at a double sided project. First attempt is not to be mentioned! Vectric free files of the month
This was my second attempt at a double sided project. First attempt is not to be mentioned! Vectric free files of the month

Sam Duncan
My Mom wanted a dish for her avocados so I made her this. Bloodwood carved on a 48 x30 Longmill. Vcarve Pro wants to kick my butt, but I have Kyle. Thank you sir, this platform rocks.
My Mom wanted a dish for her avocados so I made her this. Bloodwood carved on a 48 x30 Longmill. Vcarve Pro wants to kick my butt, but I have Kyle. Thank you sir, this platform rocks.
Davidrid Ridenhour
Cutting Board with sign engrave on back side of cutting board

Billy Jennings

Robert Pastor
All done! I hope they like it.
DG
Dean Goulet
Had to have a sign for the shop door.
MB
Marlin Birkholz
My wife likes Hummingbirds, so I made this for her. It was made out of Bacote and finished with Tung Oil.
The overall dimensions are 15.75 x 9 x .875
My wife likes Hummingbirds, so I made this for her. It was made out of Bacote and finished with Tung Oil.
The overall dimensions are 15.75 x 9 x .875
JB
John Barker
So success at last. I finally got my gun grips finished. One set was made of cherry and the other walnut (a pair of each).
This was a two sided job with the 3D model on the top and only pocket and moulding toolpaths on the bottom. Kyle's tips on how to add extensions to the profile vectors for the moulding toolpath really helped out. One of my questions in the Q&A was the thickness of the back edge of the grip. This turned out to be a problem the the cross sections of the two rail sweep. Again with his advise I used a contour gauge to measure the contour at four points down the original grips and was able to get a good 3D model. Thanks Kyle!
So success at last. I finally got my gun grips finished. One set was made of cherry and the other walnut (a pair of each).
This was a two sided job with the 3D model on the top and only pocket and moulding toolpaths on the bottom. Kyle's tips on how to add extensions to the profile vectors for the moulding toolpath really helped out. One of my questions in the Q&A was the thickness of the back edge of the grip. This turned out to be a problem the the cross sections of the two rail sweep. Again with his advise I used a contour gauge to measure the contour at four points down the original grips and was able to get a good 3D model. Thanks Kyle!

Tony Duderewicz
Made a few minions I found on cults3D and thingiverse. I used white oak cherry and ambrosia maple. They are 1 sided using v carve pro
Made a few minions I found on cults3D and thingiverse. I used white oak cherry and ambrosia maple. They are 1 sided using v carve pro

Michael Messuri
Made these out of poplar They go with the catfish ones I make. As you can see I have been experimenting with finishing techniques and #4 is in its natural unfinished state. Also, they are hand painted as I do not have a laser to etch the black parts
Made these out of poplar They go with the catfish ones I make. As you can see I have been experimenting with finishing techniques and #4 is in its natural unfinished state. Also, they are hand painted as I do not have a laser to etch the black parts

Robert Pastor
This is my newest creation. I still have to tweak it a little. I used 3D modeling, V-carve lettering, and laser etching. I hope to carve it tomorrow.
This is my newest creation. I still have to tweak it a little. I used 3D modeling, V-carve lettering, and laser etching. I hope to carve it tomorrow.

Tim Karash
Just a fun napkin holder project, combining my 2 hobbies of woodworking and model aviation.
 Made by Testimonial